
October 14, 2026
How Do You Penetration Test an AI Agent?
How Do You Penetration Test an AI Agent?

Omair



Salman Khan is a Senior Penetration Tester at ioSENTRIX with 4+ years of experience in cybersecurity and offensive security. He has conducted 80+ penetration tests across web applications, APIs, and enterprise environments, helping organizations identify and remediate security vulnerabilities. Salman has worked with well-known organizations including Samsung, Cambridge, and CompTIA, strengthening their security posture through practical security assessments and vulnerability research. His work focuses on identifying real-world security weaknesses and helping organizations improve the security of their applications and infrastructure.
Over 80+ enterprise penetration tests and years of public bug bounty hunting, I’ve earned more than $5,000+ in bounties from cross-site scripting (XSS) alone. This is the methodology behind those results and 11 reflected XSS labs I built so you can practice it hands-on.
Reflected XSS is a client-side injection flaw where user input is sent to the server and reflected straight back into the response without proper encoding, so the browser executes it as code. Finding high-impact XSS is not about firing <script>alert(1)</script> at every field. It starts before you write a single payload: systematically discovering hidden parameters and undocumented endpoints that automated scanners miss, then understanding exactly how and where your input is reflected in the DOM — inside an HTML attribute, in plain text, or deep in a JavaScript block.
What separates a script-kiddie from a senior tester isn’t luck — it’s method. In this article we break down 11 real-world reflected XSS scenarios, show how context changes everything, and walk the step-by-step techniques that consistently deliver high-impact results across professional assessments.
Before touching a payload, understand where your input lands. The context in which an application places your input determines how you attack it. Three contexts recur throughout the labs.
User-controlled input is reflected inside an HTML attribute value:
<input type="text" name="search" value="REFLECTION_HERE">
Because the input sits inside an attribute, you don’t necessarily need a new HTML tag. You can often break out of the existing attribute and add another attribute or event handler. Understanding the surrounding HTML structure is critical when testing attribute-based reflection.
The input is reflected directly into the HTML body, between existing tags:
<p>You searched for: REFLECTION_HERE</p>
Here your input isn’t inside an attribute. To turn this into XSS you generally need to introduce HTML markup that creates an executable context. The question to ask is: can I inject HTML into the page, or is my input being encoded or filtered?
User-controlled input is placed directly inside JavaScript code, such as a string literal:
<script>
  var username = 'REFLECTION_HERE';
</script>
You’re no longer dealing with an HTML attribute or normal HTML text — you’re inside JavaScript syntax. Instead of injecting an HTML tag, you need to break out of the existing string or expression and introduce executable JavaScript. We explore this in detail in the labs.
The same input behaves completely differently depending on where it is reflected:
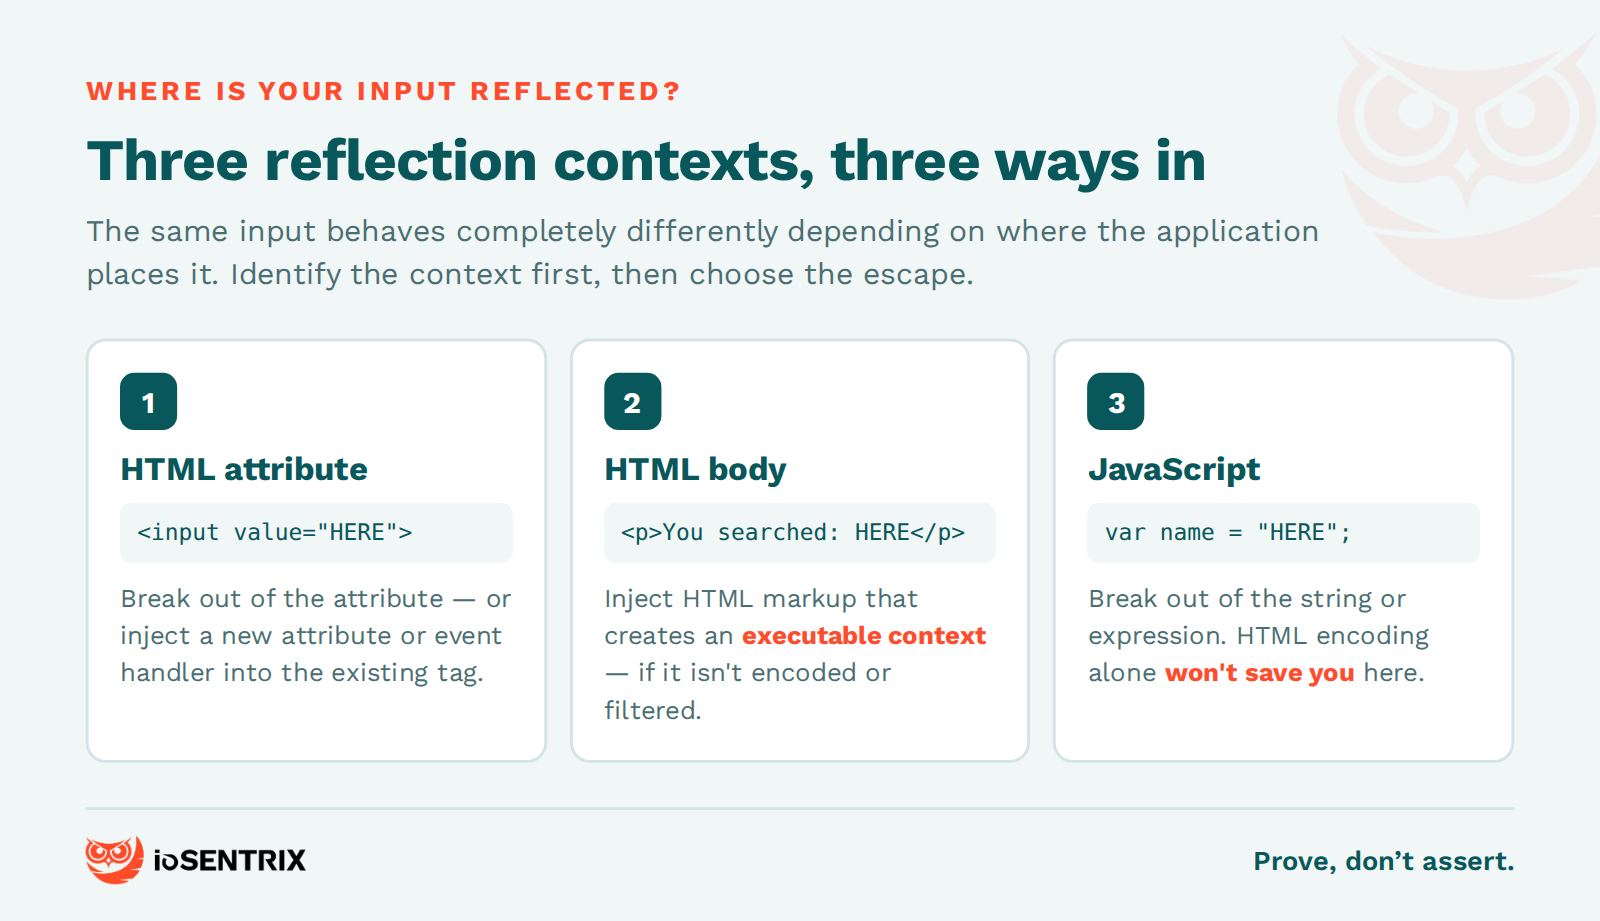
This is one of the most important ideas in XSS hunting: don’t start by asking “what payload should I use?” Start by asking “where is my input being reflected?” Once you know the context, you can work out what characters, syntax, or techniques are needed to escape it.
A diagnostic payload is a simple input you place in a reflected parameter to check whether your input is reflected and how the application handles it. Many beginners immediately reach for a full XSS payload such as <script>alert(3)</script> or <img src=x onerror=alert(1)>.
That’s not always the right move. Real applications have WAFs, input validation, filtering, and output encoding. A full payload may return a 403, get sanitized, or have characters stripped — and if you see that immediately, you might wrongly conclude the parameter is safe. Start smaller, with a diagnostic payload:
"hello           — for reflected XSS
">hello

hello"><h1>testing   — for stored XSS
hello"><a>testing
These reveal whether special characters are reflected, encoded, removed, or interpreted. The goal at this stage is not to execute JavaScript — it’s to understand how the application handles your input. After sending the payload, open View Page Source and press Ctrl + F to search for hello.
Then inspect how your input appears. If you send ">hello and the source shows the following, the characters are being reflected directly and are affecting the HTML structure — at which point the parameter qualifies for further XSS testing:
<input value="">hello">
Don’t start by throwing a full XSS payload at every parameter. First understand how your input is reflected and how the application handles special characters. Then choose a payload based on the reflection context.
Lab base URL: https://vulnxss-ashy.vercel.app/
The labs cover different techniques for identifying XSS through View Page Source and code review. For each lab, focus only on the code between the Focus: This is the current lab code and Current lab code ends here comment markers.
URL: https://vulnxss-ashy.vercel.app/RXSS/lab1
First, identify which parameters reflect your input. You can do this manually or with automation such as the Reflector extension in Burp Suite. Here, after testing the available parameters with a unique value, the search query parameter reflects our input.
You may find hundreds of reflected parameters, but not every reflection is vulnerable. Rather than jumping to a full payload, start with a diagnostic one — hello"> — then inspect the response or View Page Source and search for hello. In this lab the input reflects in two places: one properly encodes special characters, the other reflects directly without encoding. The same input handled differently in different parts of the response is exactly the reflection worth testing further.
Test whether you can inject HTML at the vulnerable point by modifying the diagnostic payload to:
hello"><h1>XSS
If the <h1> renders as HTML rather than text, you’ve broken out of the original context. If it doesn’t render, don’t assume the parameter is safe — investigate whether characters are being encoded, removed, filtered, or modified.
With HTML injection confirmed, move to an actual payload:
<img src=x onerror=alert(1)>
If the onerror handler fires and an alert appears, you’ve triggered reflected XSS. If it doesn’t, this is where the real investigation begins — determine whether the tag is filtered, event handlers removed, or characters encoded. Don’t change payloads at random; understand what’s blocking you first, then adapt.
🎉 You’ve completed your first XSS lab.
The lesson isn’t the final payload — it’s the method: find the reflection → test with a diagnostic payload → inspect the response → identify the vulnerable reflection → confirm HTML injection → escalate to XSS. And if something doesn’t work, identify what’s stopping you instead of trying another random payload.
URL: https://vulnxss-ashy.vercel.app/RXSS/lab2
Follow Step 1 and Step 2 from Lab 1. After testing the reflected input with the diagnostic payload, the search parameter reflects our input in a potentially vulnerable context.
Our previous payload injects an HTML tag successfully with "><h1>XSS. But other tags return a 403 Forbidden. That suggests the application filters specific tags rather than blocking HTML injection entirely. So instead of guessing tags, determine which tags are blocked and which are allowed — for example by fuzzing a tag list:
"><TAG>test
A useful reference is the PortSwigger XSS cheat sheet. Testing shows <script> and <img> are blocked while other tags are accepted — the filter is tag-specific, not a full HTML-injection block.
Since <script> and <img> are blocked, look for another element with an executable event handler:
<svg onload=alert(1)>
The <svg> element is allowed, and its onload handler provides an execution context — triggering reflected XSS despite the tag filtering.
🎉 Lab 2 complete. A filter blocking a few common XSS tags does not mean XSS is prevented.
URL: https://vulnxss-ashy.vercel.app/RXSS/lab3
This one is different — our input is reflected inside an href attribute, which changes the approach.
Testing with a unique value reveals a reflected parameter named returnURL, placed inside an <a> element’s href:
<a href="REFLECTION_HERE">Return to Support Portal</a>
The diagnostic payload hello"> comes back encoded as hello">. We cannot break out of the href with HTML injection — so this reflection does not qualify for direct HTML-based XSS. But don’t stop there.
Our input still lands inside the href attribute. The question becomes: can we control the URL value itself? Since the parameter is returnURL and its value is the link destination, test returnURL=https://iosentrix.com. If clicking “Return to Support Portal” redirects there, we’ve found open redirect behavior.
Now test whether the href accepts a JavaScript URL:
returnURL=javascript:alert(1)
If the application places this into the href without restricting the URL scheme, clicking the link executes the javascript: URL — reflected XSS through a JavaScript URL. Our input was HTML-encoded, so direct injection failed; looking at how the value was used is what found the bug.
URL: https://vulnxss-ashy.vercel.app/RXSS/lab4
From here on we won’t repeat the full reflection-identification process. After Steps 1 and 2, move straight to the technique. Here the input is reflected inside an <input> element:
<input type="text" name="name" value="REFLECTION_HERE">
Because it’s inside an attribute, there are two ways in.
Close the existing attribute and tag, then inject your own element:
"><img src=x onerror=alert(1)>
The "> breaks out of the attribute and structure, introducing a new <img> whose handler fires when the image fails to load.
This one matters because you’ll meet it often. If the app filters common tags like <img>, <script>, or <svg>, you can sometimes inject a new attribute into the existing element instead. Given a reflection like <input type="text" name="name" value="hello" placeholder="Search name">, an input of:
" onfocus="alert(1)" autofocus="
… closes the value attribute and adds an autofocus that auto-triggers onfocus. No new tag — you reused the existing element.
Key takeaway: you don’t always need a new HTML tag. When common tags are filtered, look at the attributes and event handlers the existing element already gives you.
URL: https://vulnxss-ashy.vercel.app/RXSS/lab5
Same approach as Lab 4, Technique 2: inject an event handler into the existing element without needing a new tag or the < and > characters. Same technique, different scenario — understanding the reflection context is the key.
URL: https://vulnxss-ashy.vercel.app/RXSS/lab6
Some applications filter specific JavaScript functions. Here alert() and prompt() are blocked. Your task: find an alternative function or execution method to confirm the XSS. If you can’t, the next lab shows another approach.
URL: https://vulnxss-ashy.vercel.app/RXSS/lab7
When common functions like alert(), prompt(), and confirm() are filtered, look for alternative ways to reference the same functionality. Keyword blacklists can often be bypassed because object properties can be accessed with bracket notation and the property name constructed dynamically. If a payload is blocked because it contains the keyword alert, build it dynamically:
<script>self['al'+'ert'](1)</script>
The takeaway: understand what is actually filtered. If it’s specific keywords rather than execution, alternative syntax or dynamic property access reaches the same functionality.
URL: https://vulnxss-ashy.vercel.app/RXSS/lab8
Sometimes an app allows tags and functions but restricts parentheses (). Without them, alert(1) can’t be called directly. But ES6 tagged template literals can invoke a function using backticks instead. If <script>alert(1)</script> is blocked, try:
<script>alert`1`</script>
When specific characters are restricted, look for alternative syntax that provides the same functionality without them.
URL: https://vulnxss-ashy.vercel.app/RXSS/lab9
When input is reflected inside a JavaScript string — for example var themeAccent = "USER_INPUT"; — HTML entity encoding alone doesn’t protect you, because the input is interpreted by the JavaScript parser. If quotes aren’t handled, you can break out of the string:
blue"; alert(1); //
The " closes the string, alert(1); runs, and // comments out the rest of the line. Identify the injection context first — a payload that works in HTML may fail inside a JS string.
Sometimes you see no visible reflection at all. During source analysis you might find a default value like var name = null;. Don’t ignore null, empty, or default values — check whether they’re controlled through URL parameters. Testing index.php?name=xss and seeing the value change to var name = "xss"; reveals a potential JavaScript reflection point. Researchers have reported significant bug bounty findings this way — up to $50,000 — by looking beyond visible reflections at how application-controlled data flows into JavaScript.
URL: https://vulnxss-ashy.vercel.app/RXSS/lab10
Useful parameters and endpoints often aren’t visible in the UI but can be discovered in the application’s JavaScript files. Here a JS file contains a hidden URL and parameter usable as an XSS injection point. Always analyze JavaScript files during testing — they reveal hidden endpoints, parameters, and attack surface that isn’t exposed in the interface.
URL: https://vulnxss-ashy.vercel.app/RXSS/lab11
A blank or static page with no visible parameters does not mean XSS testing is over. There may be hidden endpoints, directories, files, or parameters. Use directory and file fuzzing with FFUF and a wordlist such as Assetnote or SecLists. Fuzz the directory:
ffuf -u https://vulnxss-ashy.vercel.app/RXSS/lab11/FUZZ -w common.txt

  /dev → 200 OK
The /dev directory holds nothing useful directly, so continue inside it:
ffuf -u https://vulnxss-ashy.vercel.app/RXSS/lab11/dev/FUZZ -w common.txt

  /active → 200 OK
Next, fuzz for HTML files instead of directories:
ffuf -u https://vulnxss-ashy.vercel.app/RXSS/lab11/dev/active/FUZZ -w html.txt

  review.html
Now move to parameter discovery — tools such as Param Miner help identify hidden parameters. For this lab the hidden parameter is /review.html?id=xss. A page with no visible parameters does not mean there is no attack surface — fuzz directories, files, endpoints, and parameters to uncover it.
After 11 reflected XSS labs, the main lesson is that XSS testing isn’t about trying payloads until an alert box appears. A good methodology starts with finding the reflection, understanding where and how your input is processed, and identifying the context it appears in. From there you determine what prevents execution — filtering, encoding, keyword restrictions, character restrictions, or simply the wrong payload for the context. Important attack surface isn’t always visible either: JavaScript files, hidden parameters, directories, endpoints, and files all reveal injection points that are easy to miss.
The goal is to build the habit of asking “why doesn’t this payload work?” instead of moving on. Once you understand what’s blocking your input and what context you’re in, you choose a technique based on the application’s behavior rather than a payload list:
Find the input → understand the reflection → identify the context → analyze the restrictions → find a way around them → confirm XSS.
That methodology is what makes XSS testing effective in real-world applications.
What is reflected XSS?
Reflected cross-site scripting is an injection flaw where user input is sent to the server and returned in the response without proper encoding, so the browser executes it as script. Unlike stored XSS, the payload isn’t saved — it’s reflected back within a single request, typically via a URL parameter.
How do you find high-impact XSS?
Start before the payload. Discover hidden parameters and endpoints that scanners miss, then identify the reflection context — HTML attribute, HTML body, or JavaScript. Use a diagnostic payload to see how special characters are handled, confirm HTML injection or context break-out, then escalate to an executable payload suited to that context.
Why does reflection context matter in XSS?
The same input behaves differently depending on where it lands. In an attribute you break out of the attribute; in the HTML body you inject markup; inside JavaScript you break out of the string or expression. Choosing a payload without knowing the context is why most attempts fail.
How do you bypass an XSS filter that blocks <script> and <img>?
Filters are often tag-specific rather than a full HTML-injection block. Enumerate which tags are allowed and use one with an executable event handler, such as <svg onload=…>. When functions or characters are filtered, use dynamic property access (bracket notation) or ES6 tagged template literals to reach the same functionality.
What tools are used for reflected XSS testing?
Burp Suite (Proxy, Repeater, and the Reflector extension) for finding and confirming reflections, the PortSwigger XSS cheat sheet for context-specific payloads, FFUF for directory and file fuzzing, and Param Miner for hidden-parameter discovery.
ioSENTRIX is a CREST-accredited, ISO/IEC 27001 certified, SOC 2 Type 2 attested penetration testing firm. Cross-site scripting keeps reaching production because it hides in the exact places automated scanners skip — hidden parameters, serialized payloads, and context-specific reflections that only manual, methodical testing surfaces. Our web and application penetration testing exercises every input the way an attacker does: mapping the full attack surface, testing each reflection in its real context, and delivering evidence rather than a scanner’s guess. If you’re shipping web applications or APIs, we can help you prove your input handling actually holds before someone else tests it for you.